MyColorPicker : intuitive color picking
MyColorPicker is a free and open source color picker for Photoshop.
It is simple, very compact, yet has some unique features.
I did it to fit my needs of color picking for painting, and thought it did it quite well, so I figured I'd share it with you ! Hope you'll like it.
MyColorPicker works from version CC 2014.2 of Photoshop on. It could work with older CC versions, but there is no guarantee.
Open source
Developers : project sources are available on MyColorPicker page on github.
Getting help
If you can't find an answer to your question on this page, please use Adobe Exchange forums.
Please include the keyword "MyColorPicker" in the title to make the answer easier to find for others who have the same problem.
This forum is also the place for all your feature requests, comments, suggestions, ...
You can also drop me an email (my email is on my Adobe Exchange page). Please post your question on the forum first, I'll answer it there so others can benefit from it.
Download and Installation
- Click on "Free" in MyColorPicker page on Adobe Exchange.
- Make sure file synchronisation is on in Adobe Creative Cloud (Preferences/Files/Synchro on/off => on)
- In Home tab of Adobe Creative Cloud, you should see that MyColorPicker was installed.
- Restart Photoshop.
- In Photoshop, click Window/Extensions/MyColorPicker to display the panel.
- If you want to use keyboard shortcuts (you should !), see keyboard shortcuts below.
That should do it !
If there is a problem, you can try to install it manually :
- Download MyColorPicker zxp extension package file : on
MyColorPicker page on Adobe Exchange,
in the tab "Where to find it", click "Download / install another way", "Download with extension manager", "Download MyColorPicker",
and choose a place on your hard drive
- Open Adobe Extension Manager.
- Pick a Photoshop version on the left (MyColorPicker works from CC 2014.2 on).
- File/Install, and pick the zxp file you downloaded.
- You may have to restart Photoshop.
- In Photoshop, click Window/Extensions/MyColorPicker to display the panel.
Elements
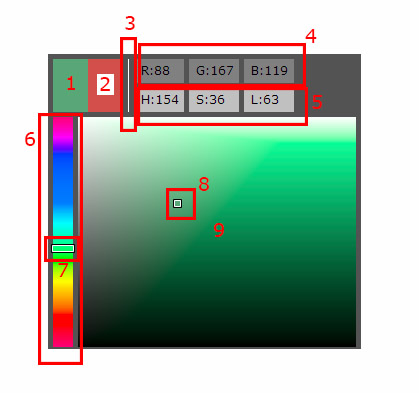
- 1. Current Color swatch.
- 2. Old Color swatch
- 3. Focus indicator
- 4. RGB values
- 5. HSL values
- 6. Hue slider
- 7. Hue marker
- 8. Saturation / luminosity marker
- 9. Saturation / luminosity area
How does it work ?
The main difference between MyColorPicker and other pickers is how the colors are presented in the main area (9).
That area is calculated so that a color at a given vertical position always has the same luminosity.
This means that color luminosity will not change if you change hue or saturation.
Another great difference is keyboard shortcuts. Don't miss the next paragraph !
Apart from that, you will pick colors mostly like in any other color picker. Still two or three things are worth noting :
- H, S and L controls (5) are draggable vertically. That allows you to quickly change one of the three without affecting the others.
- Current and Old color swatches are BIG so you know what color you are using.
The benefit of the old color swatch is, like in photoshop's native picker, to compare old and current color.
Clicking a swatch will change the other swatch's color to the color of the swatch you clicked.
- Of course, like the other third party color pickers, it modifies Photoshop foreground color, and reversly updates when you change Photoshop's foreground color.
- It will works nicely with Photoshop native color picker and color panel
Keyboard shortcuts
Keyboard shortcuts are an awesome functionality of MyColorPicker ! Please take an instant to see how they work.
Here is what you need to do :
- Download this file to your hard drive.
- Unzip it to Photoshop's Scripts Presets folder. You can use a subfolder of this folder. It is located something like :
- On Windows, C:\Program Files\Adobe\Adobe Photoshop CC 2014\Presets\Scripts.
- On Mac, /Applications/Photoshop CC 2014/Presets/Scripts
- Restart Photoshop.
- MyColorPicker scripts should now be installed ! You should see them in Photoshop's File / Scripts submenu. If you do, you can now assign any keyboard shortcut you like to MyColorPicker scripts ! Keep reading if you don't know how to do that.
- Open Keyboard Shortcuts dialog by using Edit / Keyboard Shortcuts... menu
- You'll find all MyColorPicker scripts under File / Scripts.
- Enter any keyboard shortcut you like for all scripts you want ! You will find a list of the scripts below.
Scripts list
Here is a list of MyColorPicker scripts and what they do. The extension (.jsx) doesn't appear in keyboard shortcuts dialog.
| Script | Action |
|---|
| my_color_picker_dec_hue.jsx | Decrease Hue |
| my_color_picker_inc_hue.jsx | Increase Hue |
| my_color_picker_dec_sat.jsx | Decrease Saturation |
| my_color_picker_dec_sat.jsx | Increase Saturation |
| my_color_picker_dec_lum.jsx | Decrease Luminosity |
| my_color_picker_inc_lum.jsx | Increase Luminosity |
| my_color_picker_add_swatch.jsx | Add Swatch from MyColorPicker current color |
Limitations
As I said earlier, I did MyColorPicker to fit my needs, and there are some needs I don't have, or could live with :).
For many of them, you can just use Photoshop's Color panel or Color Picker. They will work with MyColorPicker just fine.
If you miss a functionality, let me know using adobe exchange forum ! See above.
| Functionality | Suggestion |
|---|
| You can't edit background color | You can set foreground color, then switch foreground and background color using 'X' keyboard shortcut. |
| There is no CMYK values | You can use Photoshop's native picker / color panel |
| You can't edit RGB or HSL values by entering numbers | You can use Photoshop's native picker / color panel |
| You can't drag RGB values | You can use Photoshop's native picker / color panel |